

Staying on top of information gleaned from virtual meetings is crucial. Microsoft Teams, a popular collaboration platform, offers seamless communication channels.
But what if you, as a participant, need to capture the valuable insights shared during a Teams meeting? Can you record the session without being the organizer?
The answer is yes, with a few considerations. This comprehensive guide will equip you with the knowledge and tools to record MS Teams meetings as a participant, ensuring you never miss a critical detail.
What to Know About Permissions on Teams
Recording meetings in MS Teams is straightforward, provided you have the necessary permissions. It’s important to understand the structure and rules within your organization’s Teams setup, as these can affect your ability to record meetings.
Permissions and Preparations
Before you hit the record button, you must have the right permissions. These are typically granted by IT administrators within your organization and are influenced by the type of Microsoft 365 or Office 365 plan your organization subscribes to (e.g., Enterprise E1, E3, E5, F3, A1, A3, A5, Business Premium).
Here's a breakdown of the factors that determine your ability to record:
- Meeting Organizer Permissions: The meeting organizer can control the meeting recording capabilities (if enabled by the IT Admin). They must have recording enabled within their Teams settings for participants to have the option to capture the session.
- Participant Recording Permissions: Even if the organizer has recording enabled, some organizations might implement stricter policies. Your IT admin can restrict recording permissions entirely, limiting the ability to record to organizers or specific participants.
It's always a good practice to check with the meeting organizer beforehand if you plan to record the session. This ensures transparency and avoids any potential confusion.
Here's a quick summary of recording permissions in Teams:
- Meeting Organizer with Recording Enabled: Participants can record the meeting if their individual recording permissions haven't been restricted by the IT admin.
- Meeting Organizer with Recording Disabled: Participants cannot record the meeting regardless of their individual permissions.
- IT Admin Restricted Recording: No participant, including the organizer, can record the meeting.
How to Record With MS Teams' Native Tool
Now that you understand the permission landscape, let's explore the method available for recording Teams meetings as a participant (when permitted):
- Join the Meeting: Start by launching the Teams meeting invite from the calendar or joining the session through the Teams app. Make sure you have the necessary permissions to record the meeting. If you are not the meeting host, you will need to request that they initiate the recording.
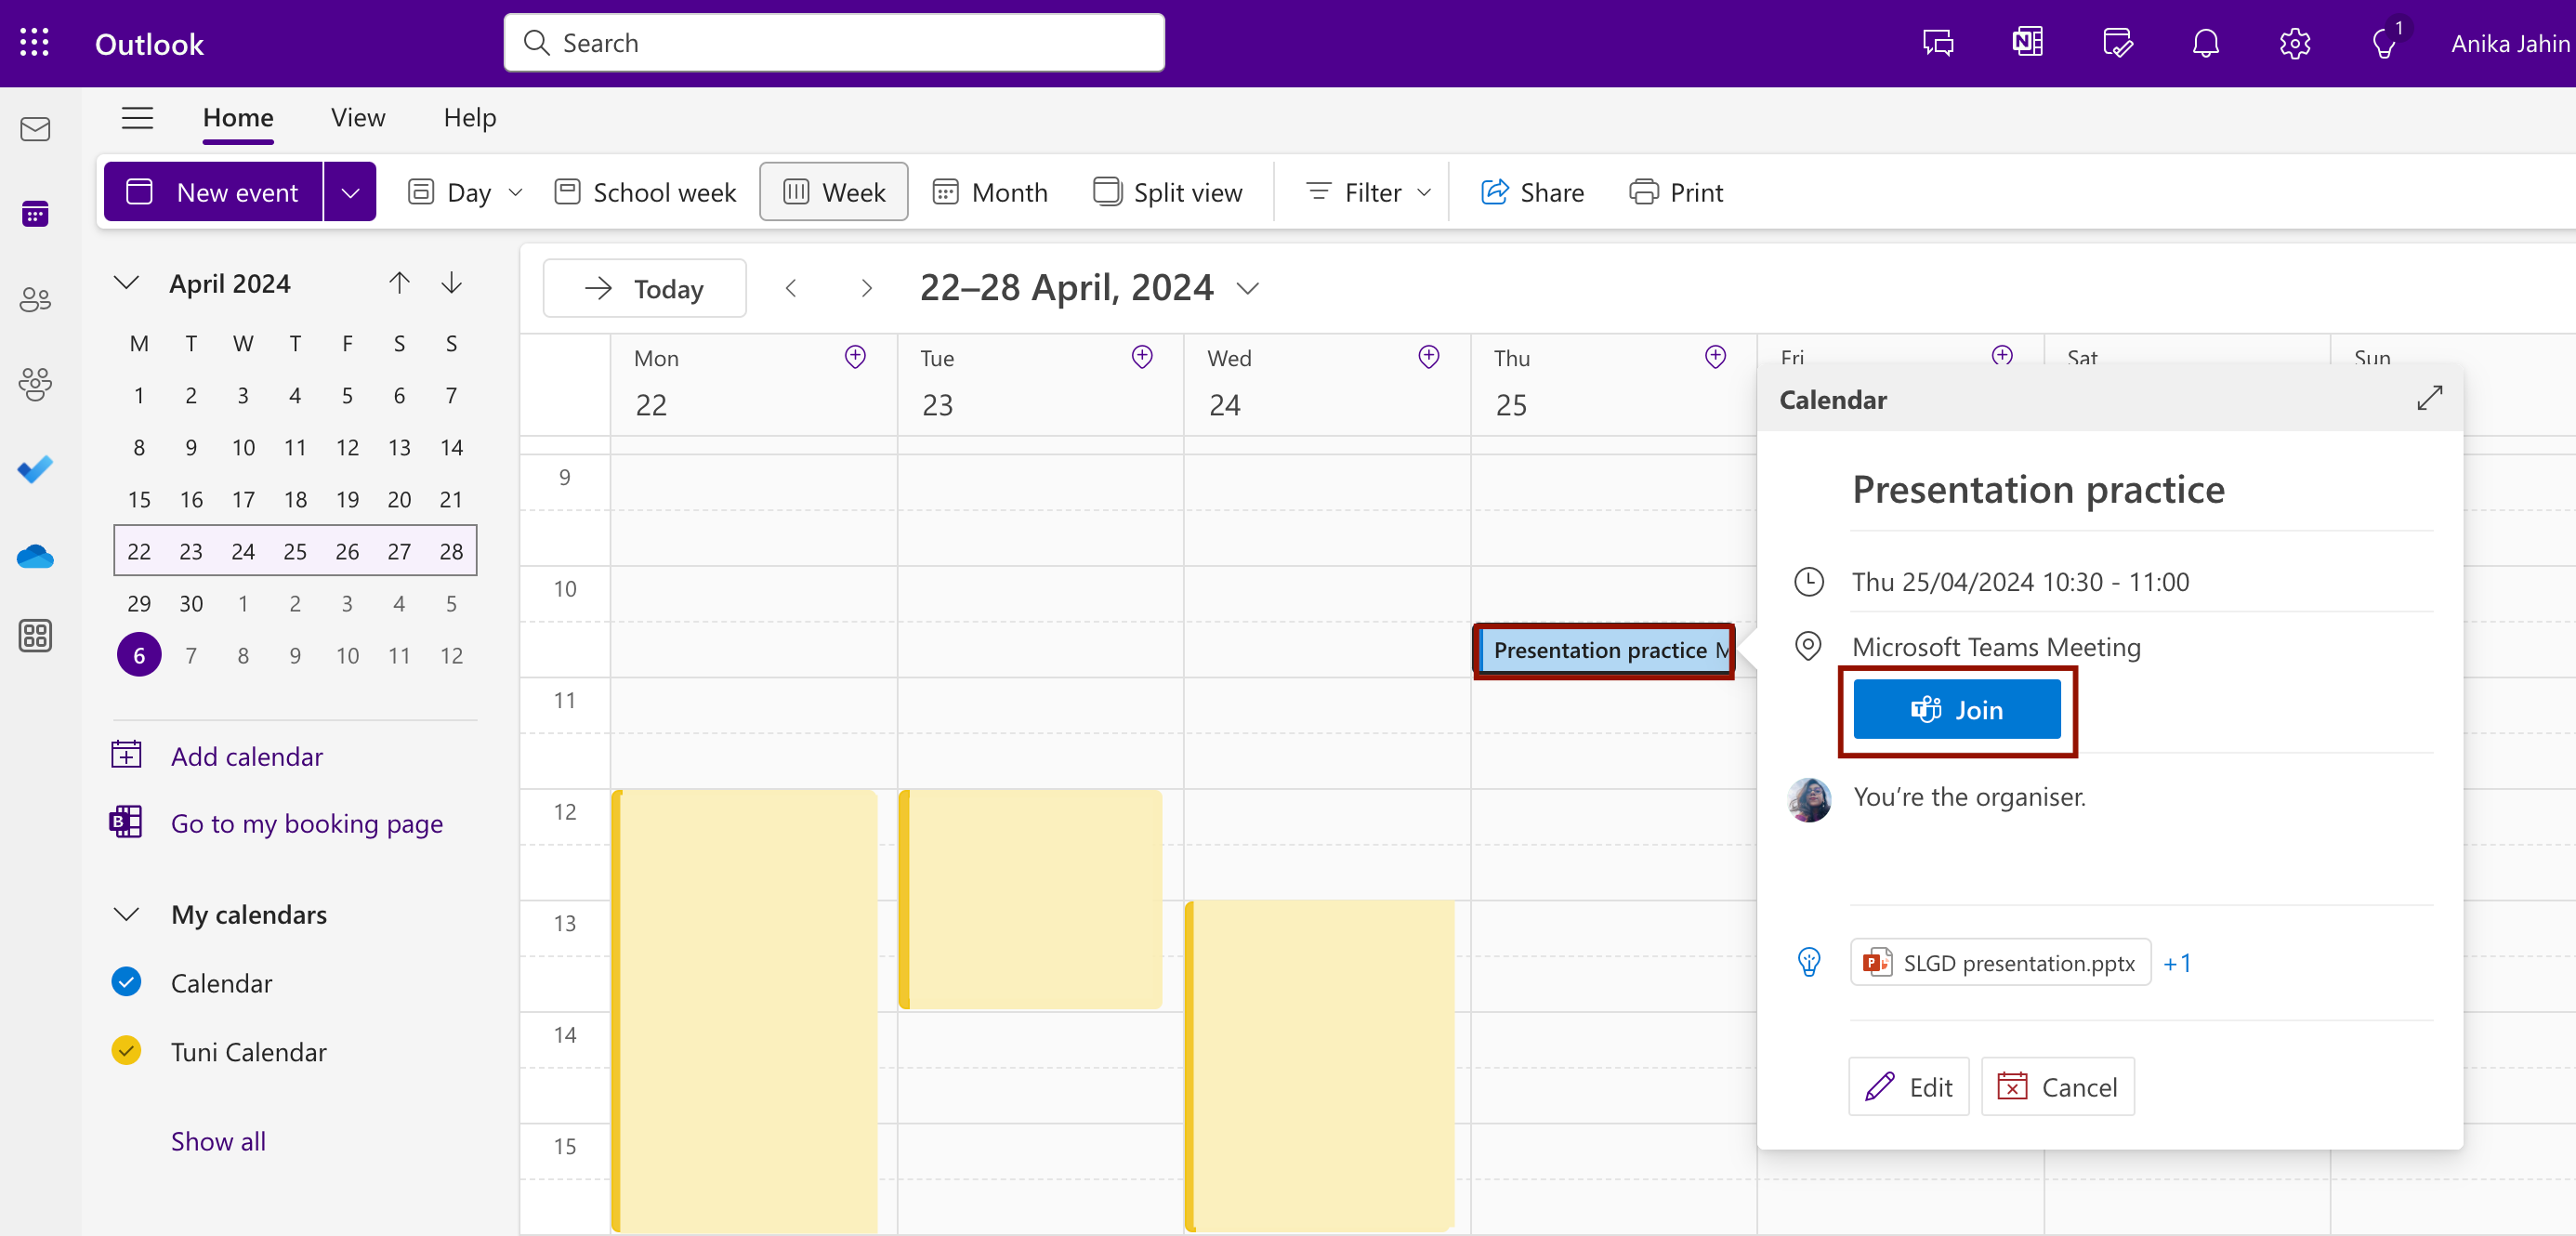
- Access Meeting Controls: Navigate to the meeting controls bar and click three horizontal dots or the "More" button.
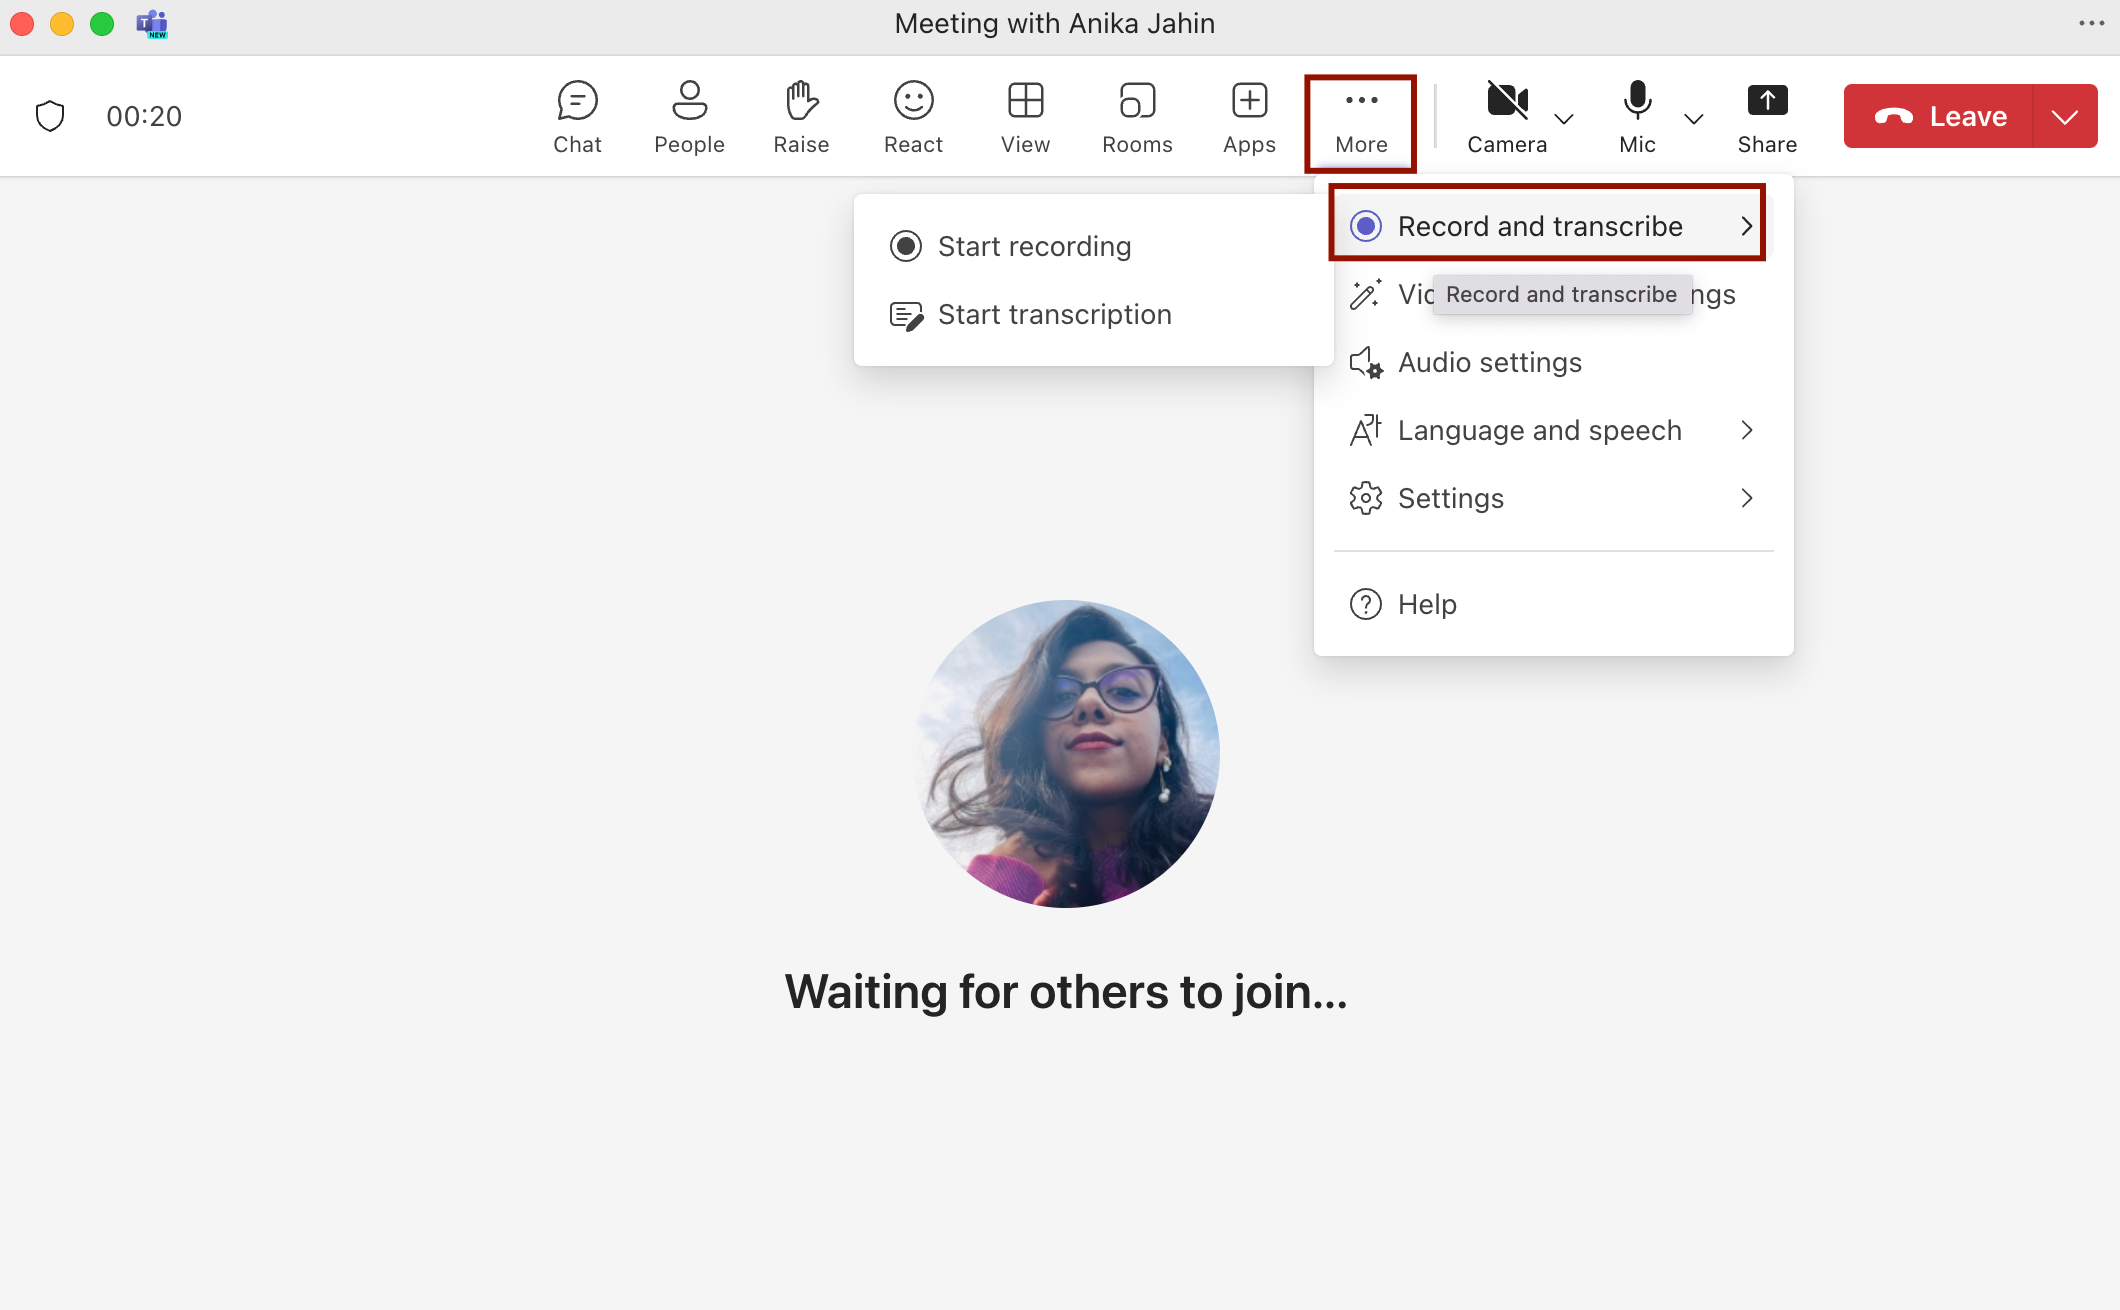
- Start Recording: Select the "Start recording" option under "Record and transcribe" to begin the recording. A notification will appear informing other participants that the meeting is being recorded. If the participant's audio is unmuted, only audio is recorded. If the video is on, both audio and video are recorded.

- Stop Recording: Once the recording has started, you will notice a red circle indicating that the meeting is being recorded. To stop the recording, navigate to the menu in "More", then click "Record and transcribe," and "Stop recording".
- If the call ends (by the host or the participant), the recording can be found in the chat (stored in the Microsoft Stream/OneDrive cloud environment).

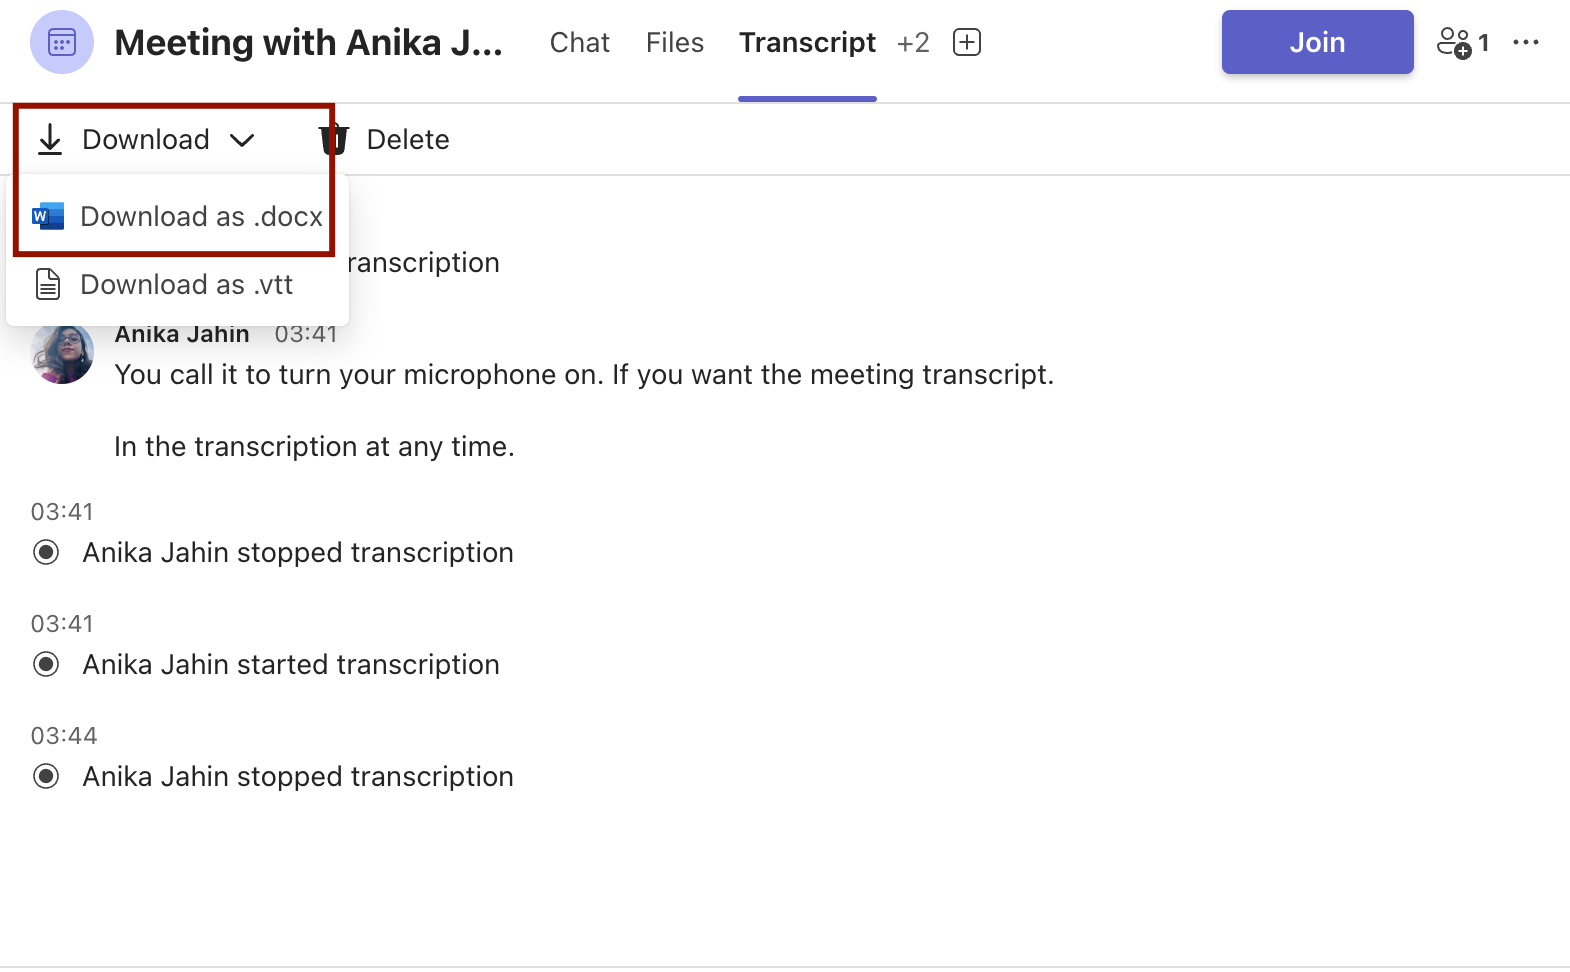
- Start & Stop Transcript: Utilize the built-in transcription recording feature in Teams. When you start the recording, teams will start recording the meeting transcript by default. Remember to unmute yourself while speaking because teams will not record any transcript otherwise. You can stop the transcription anytime by clicking the "Stop transcription" button.

- Download Transcript: MS Teams does not generate notes for you, and if multiple people are talking simultanuously within a meeting recording, the transcript can make less sense. After the meeting, transcripts will be saved alongside recordings in either OneDrive or SharePoint, depending on the meeting type. You can download the transcript in a word file or you can just simply delete it if you want. MS Teams offer you the flexibility to download it as a .docx or .vtt file.
Technicalities of MS Teams Built-In Recording
- Recording Initiation: Only one person can initiate the recording at a time. If the organizer has already started recording, you won't be able to start another one. Once an individual starts recording, others have to wait until the recording is stopped.
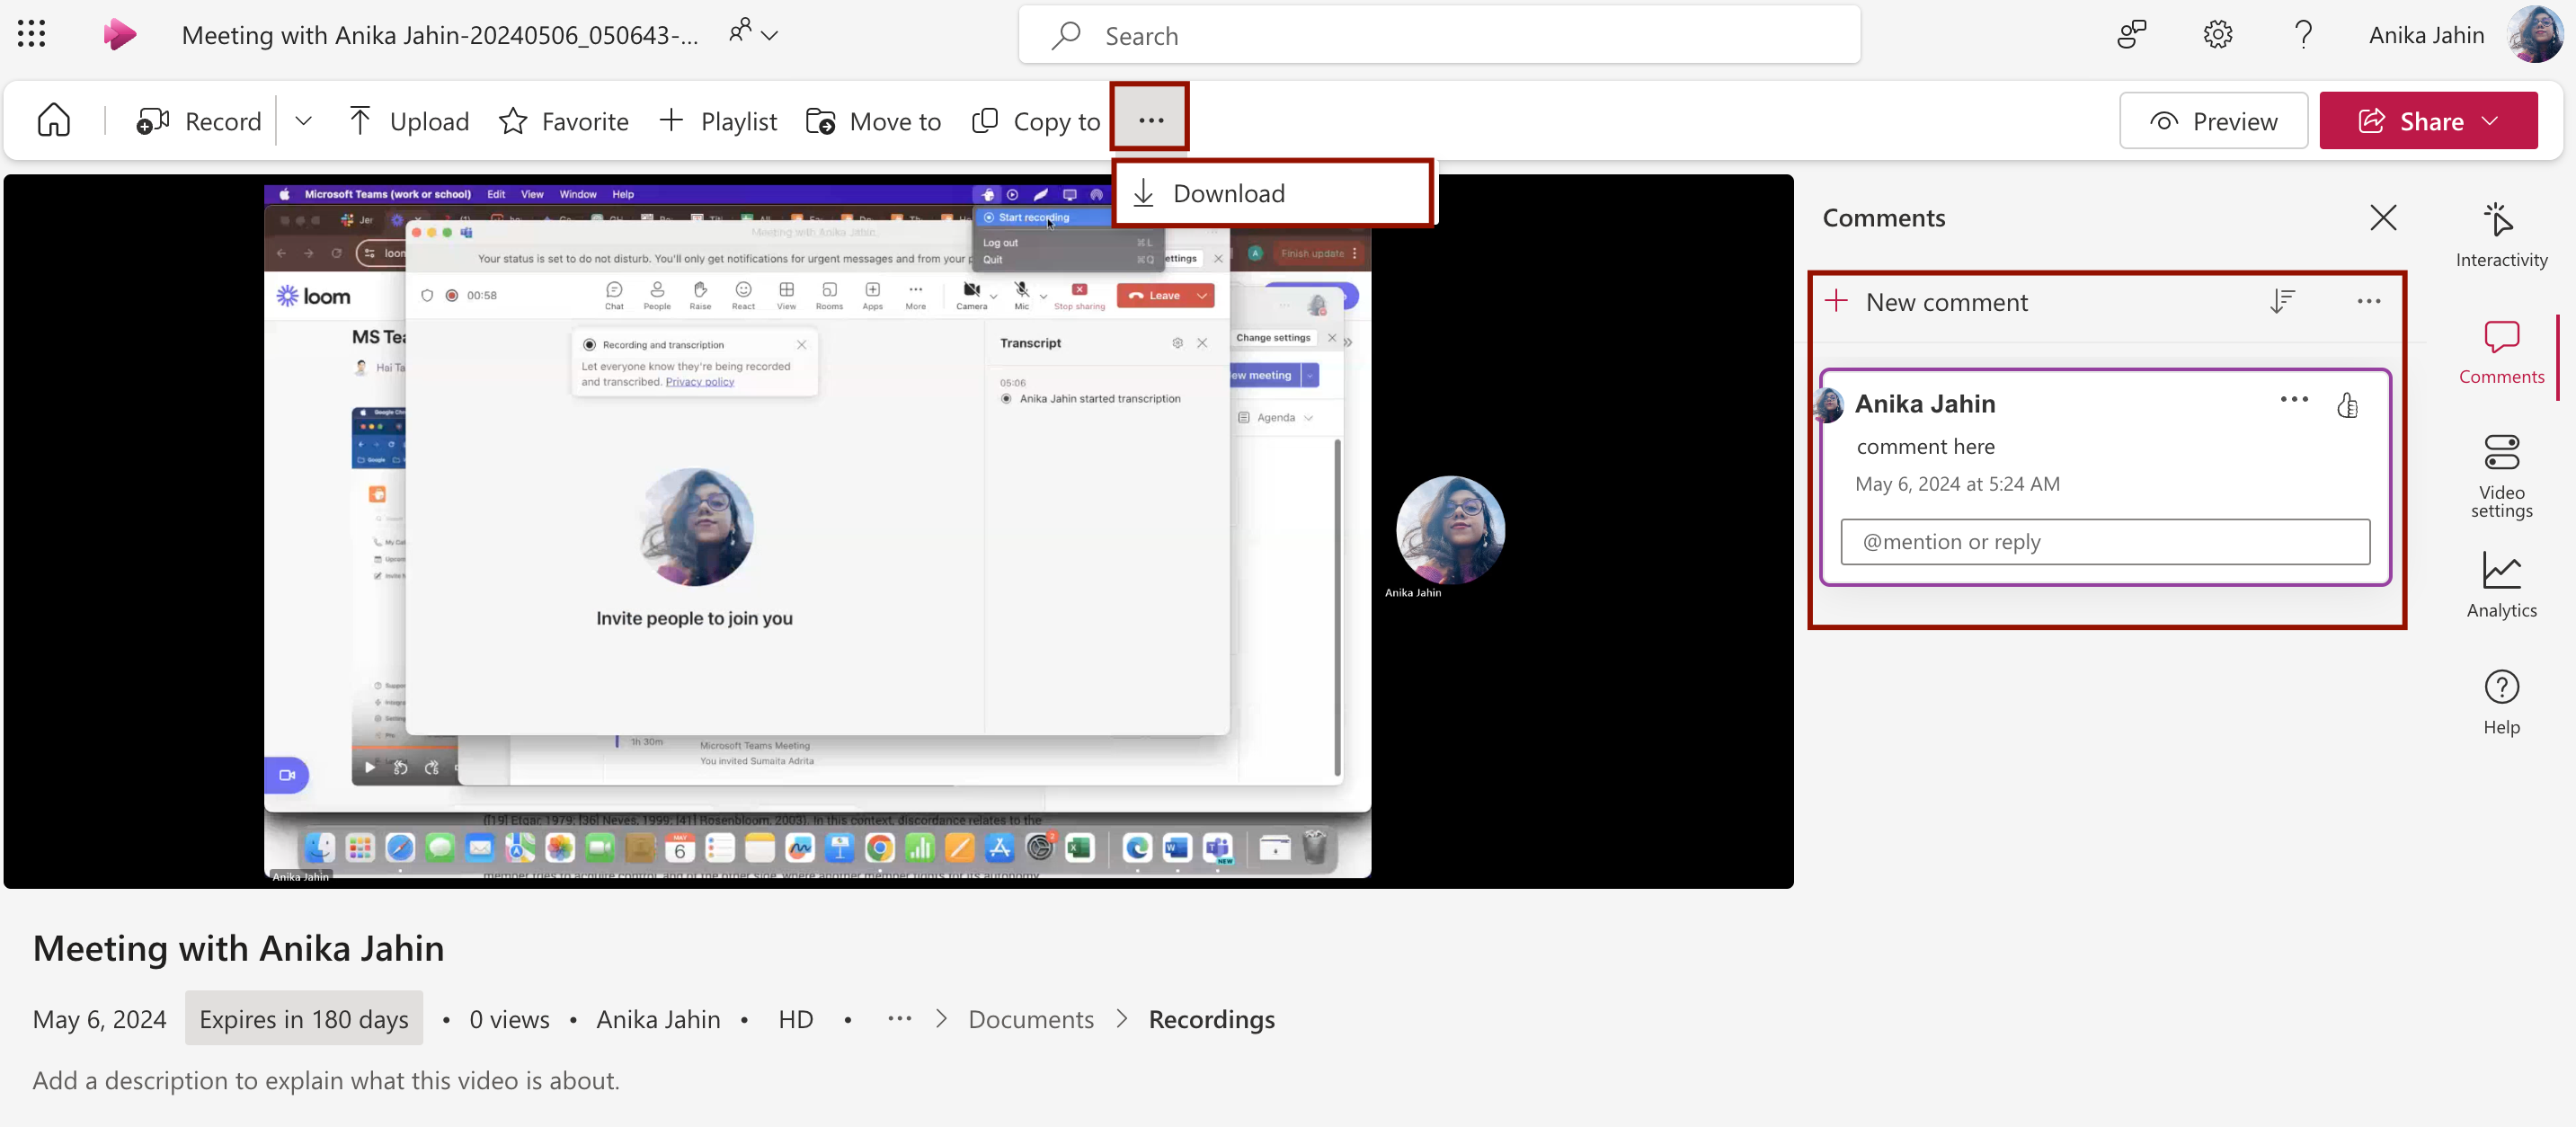
- Recording Location: Recordings initiated by participants using Teams' built-in feature will be stored in either OneDrive/SharePoint/Microsoft Stream, depending on the meeting type (channel meeting or private meeting).

- Simply click on the recording in the chat and it will open on Stream. From there, you can comment on the recording, share it with defined accessibility settings, download the video, and more.
- Recording Expiration: Recordings in Teams might have an expiration date set by the organizer or your IT admin. Ensure you download or save a copy of the recording if you require long-term access.
- Meeting Privacy: Always remember to inform other participants if you're recording the meeting, especially if it's a confidential discussion. As per the privacy policy of MS Teams, it is mandatory to inform all the participants that they are being recorded.
An Easier Way to Record Teams Meetings
Want less hassle with all the required permissions and other restrictions made by Teams?
Here's how to record your meetings in 4 simple steps with Wudpecker.
Note: Currently these steps only work for Mac, but a Windows desktop app is coming soon. In the meanwhile, you can use our notetaker bot which works without installing an app!
Setting up the app and your account
Step 1: Go to this page for the download link and install the app.
Step 2: Open the app from the Applications folder or by pressing Cmd + Space, then typing Wudpecker and pressing Enter)
Step 3: Sing up or sign in to Wudpecker with your Microsoft or Google account. (A browser tab will automatically open for that)
Using the app
Step 4: Start recording.
Now you're free to either conduct a physical or remote meeting. Wudpecker records both from the system and the microphone, so it doesn't matter where your meeting is or which account you're using on the meeting platform.
You can also pause and continue the recording any time, in case you don't want certain parts to stay on record.
There will be no notetaker bot or anything else visible joining your virtual meeting room.
Once you stop recording, Wudpecker automatically starts processing the notes and opens them for you.
There's no expiration date for your notes, and Wudpecker offers unlimited meeting summary storage.
Wudpecker vs. Microsoft Teams Comparison
While MS Teams provides a native recording tool, it's not necessarily the easiest to use and doesn't provide many smart features. A side-by-side comparison between MS Teams' recording and Wudpecker's AI notetaking tool reveals more details of why Wudpecker is a superior tool for recording meetings.
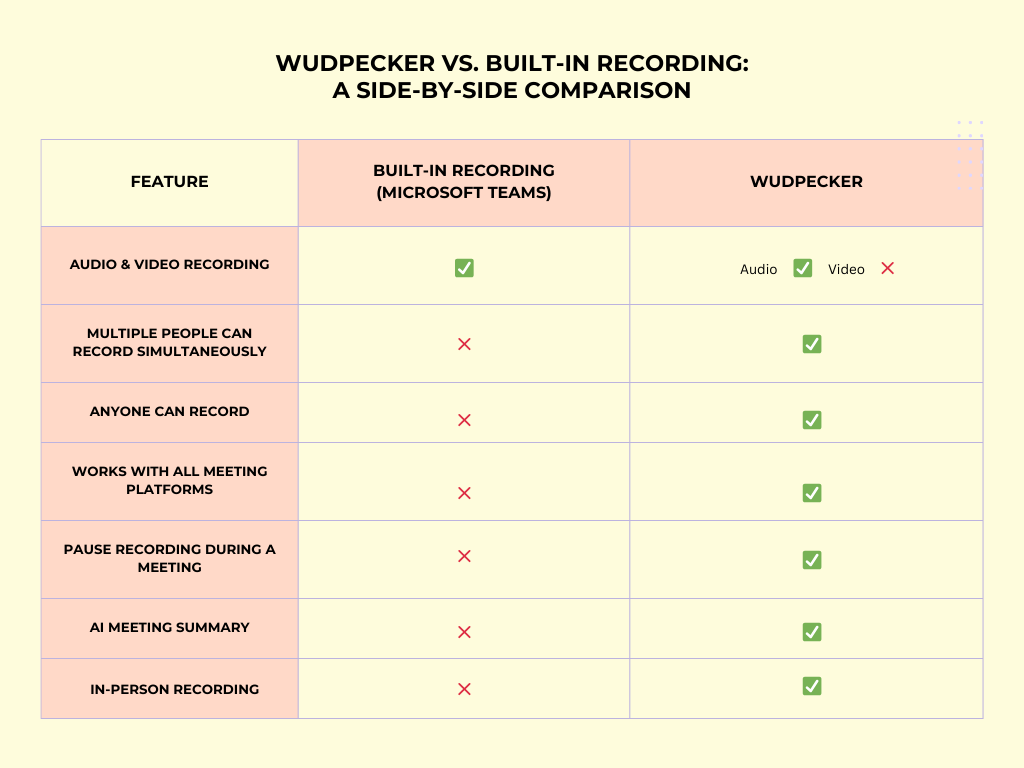
(1) Video and Storage Space
Wudpecker only allows audio recording, which takes up less space than video recordings and provides more storage flexibility for the user. This makes the processing and loading time of automated meeting summaries much faster.
Microsoft Teams allows both video and audio recording, but it consumes a significant amount of space in OneDrive.
(2) Allowing Multiple People to Record Simultaneously
In Teams, only one person can record during the meeting. Others must wait until the recording is stopped.
It's not the same for Wudpecker. Multiple participants can record the same meeting on their own computer simultaneously without disrupting others or waiting for any permission.
(4) Who Can Record
As discussed earlier, recording permissions are controlled by the meeting organizer and IT admin in the Microsoft Teams environment. You might not always have the ability to record.
Wudpecker allows you to start recording meetings regardless of your role in the meeting without waiting for organizer permission or fiddling with recording settings.

(5) Recording on Any Meeting Platform
Wudpecker is a tool that can record any meeting type on any meeting platform, whether it is Microsoft Teams, Google Meet, or something else.
Being a built-in recording tool, you can not expect the same from Microsoft Teams.
(6) Pausing Recording During a Meeting
The Wudpecker app has an easy-to-use interface that simplifies recording management and integrates seamlessly with your existing workflow. You have the option to pause the meeting recording whenever you want and resume it later without creating multiple recording files, which is not possible with MS Teams.
Instead, the Wudpecker recording file remains a single file, but the conversations during the paused timeframe are not recorded. This feature provides a significant level of flexibility that MS Teams does not offer.
(7) AI Meeting Summary
MS Teams only generates live transcription that you can also read after the meeting.
Wudpecker, on top of generating a transcript, also gives you a summary of your meeting, split into sections based on the topics of discussion. You can edit the summary as you like or ask for additional insights from the meeting with the Ask Wudpecker feature. You no longer need to scroll through or listen to the whole transcript to find specific information from the discussion.
Common Features for Both Wudpecker and Teams
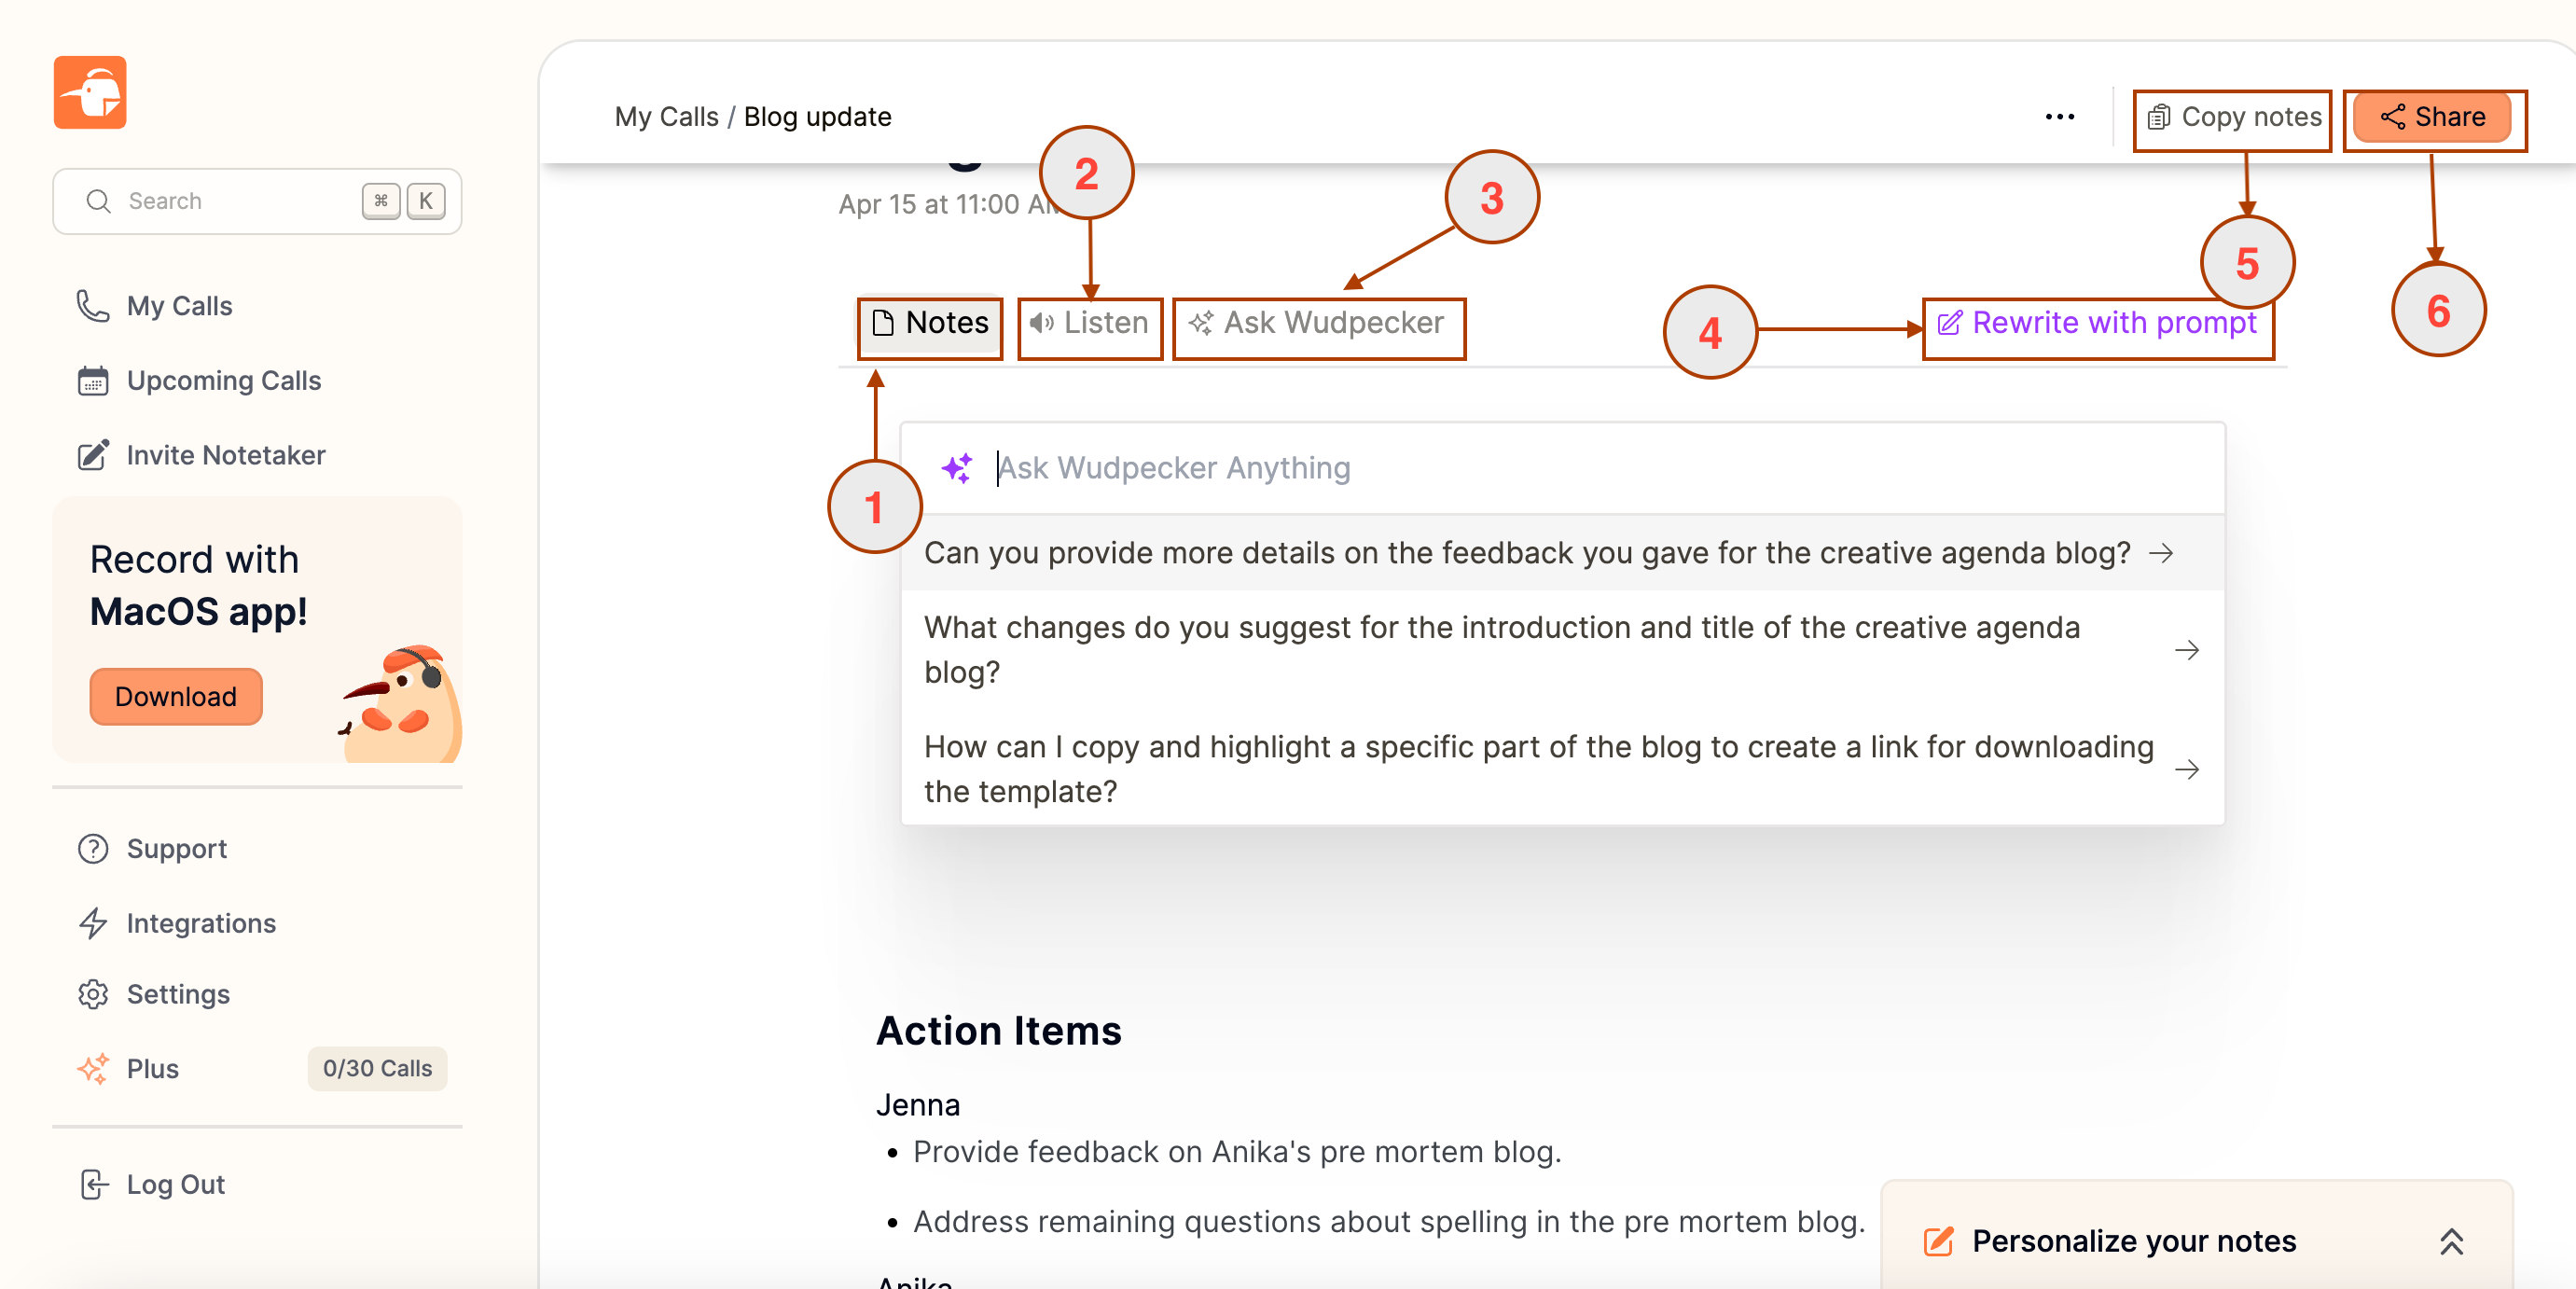
- Copy (#5 in the photo): You can copy the contents of the notes using this button. This is same with MS Teams also.
- Share (#6): You can share the notes with your team members or anyone else using the share option. Same with MS Teams.
- Listen/Transcript (#2): Both Woodpecker and MS Teams enable users to listen to the meeting recording and review the transcript after the meeting.
Features That Only Wudpecker Offers
- Meeting Summary (#1): After the meeting ends, Wudpecker will redirect you to a page where the entire meeting is summarized, along with all the action items and more.
- Everything in One App/Place: In Wudpecker, you can easily access meeting recordings and transcripts from the same place. However, in MS Teams, accessing meeting recordings and transcripts is not as straightforward. You need to use Microsoft Stream to listen to or watch the recording, and if you want to review the transcript, you have to access it from a different link or download it locally for future use. Downloading the recording and transcript in MS Teams ensures that you won't lose access to them even after they expire. On the other hand, in Wudpecker, you don't have to worry about losing access to the recording because it will be available forever.
- Ask Wudpecker (#3): If you forget any important points or discussions, you can Ask Wudpecker anything about the meeting. It even suggests questions for you so that you get as many AI insights from the discussion as possible.
- Rewrite with Prompt (#4): You have the option to customize your notes by rewriting them with your own personalized prompt. Wudpecker also provides the flexibility to add a new section in the meeting summary and edit the existing sections according to your preferences. This feature is not available in MS Teams, as their transcripts are not editable and there is no summary.
(8) In-Person Recording
Microsoft Teams recording is only suitable for online meetings that take place on the Teams platform. Therefore, the meeting must be an online meeting for it to be recorded.
However, this is not the case with Wudpecker. With the Wudpecker desktop app, any meeting, whether it's online or in person, can be recorded. Wudpecker records both your system and microphone audio, which makes this flexibility possible. This is one of the best features of the Wudpecker app.
Conclusion
Recording a MS Teams meeting as a participant is straightforward once you understand the permissions and tools available. By combining MS Teams with Wudpecker’s desktop app, you can streamline the recording process, ensuring that all meeting insights are captured efficiently without intruding on the meeting’s flow.
As remote work continues to evolve, these tools will be invaluable for maintaining thorough records and enhancing team collaboration.
FAQs
How Do You Record a Teams Meeting When You Are Not the Host?
To record a MS Teams meeting when you are not the host, you need to ensure you have the necessary permissions, which are typically granted by your organization's IT administrator. If you don't have automatic permission, you can ask the meeting host to start the recording or request the necessary rights from your IT admin.
Once you have permission, you can start recording by clicking on the ellipsis (…) in the meeting controls and selecting "Start recording". Everyone in the meeting will be notified that recording has begun.
If you can't record directly, consider asking another participant to initiate the recording or use external recording tools, ensuring you comply with legal and organizational policies.
Why Can’t I Record My Teams Meeting?
There are a couple of reasons why you might be unable to record a Teams meeting as a participant:
- Permissions: You may lack the necessary recording permissions set by your IT administrator.
- Subscription Limitations: Your Microsoft 365 subscription might not include meeting recording features. This feature is generally available in higher-tier plans like Enterprise E1, E3, E5, and some Business plans.
- Policy Restrictions: Your organization's policies might restrict recording capabilities to certain roles or scenarios.
- Technical Issues: There could be temporary issues with MS Teams or your internet connection that prevent recording.
To resolve this, check your subscription details, confirm your permissions with your IT administrator, or seek technical support if it's a system issue.
How Do You Record an Online Meeting as a Participant?
If the meeting host allows, as a participant, you can record online meetings. You can find the 'start recording' option in your meeting platform's interface.
There are some guidelines on how to record a Zoom meeting, and you can also check out a blog on how to record a Google Meet.
If the 'start recording' option is not available, you can consider using wudpecker's meeting recording MacOS app.
P.S. Windows version coming soon!
.svg)


_.png)


.png)
.png)


.png)


.svg)
