
.png)
Google Meet is important for virtual meetings in business, education, and personal use. It's often necessary to record these meetings to keep track of discussions and share them later with absent participants or for review.
Some people use note-taking bots to automatically join the meetings and record the sessions. However, these bots can raise privacy concerns and disrupt the conversation flow.
Alternatively, Google Meet includes a built-in recording feature, which may only be accessible to users with specific Google Workspace plans. This option is secure but has limitations and is not accessible to everyone.
There’s a superior way to do this without having to worry about permissions and limitations. Read more to find out.
How to Record with Google Meet's Tool
- Start the Meeting: Begin by launching your Google Meet meeting. Ensure you have the necessary permissions to record the meeting. If you're not the meeting host, you'll need to ask them to initiate the recording.
- Locate the Record Button: On the bottom of your Google Meet window, you'll find three vertical dots. Clicking on them will reveal a dropdown menu.
.png)
- Initiate Recording: From the pop-up menu, select the "Record meeting" option. A prompt will appear to confirm, and once you select "Start recording," the recording begins. Now, there should be a red recording symbol in the top left corner of the screen.
- Ending the Recording: To stop recording, revisit the menu and click on "Stop recording." Once done, the recording link will be saved to the meeting organizer's Google Drive ("Meet Recordings" folder).
+ Pro tip: If you want captions in your Google Meet video recording, press the "CC" button next to the camera button. Note, however, that the captions may become playable on Google Drive up to a few hours after the recording file is generated.
Why Can’t I Record on Google Meet?
If you’re having trouble recording a Google Meet session, several factors might be the cause. Understanding these limitations can help you determine why you might not be able to record on Google Meet and guide you toward possible solutions.
Let’s explore those factors:
- Google Workspace Edition: Recording is only available in certain Workspace editions like Business Plus, Standard, and Enterprise—not in free or 'Education Fundamentals' plans.
- Google Drive Space: Ensure you have enough storage in Google Drive, as recordings are saved there.
- Permissions: Only the meeting organizer or someone from the same organization can record, and permissions are managed by your Workspace admin.
- Mobile Device Limitations: Recording isn’t supported on phones or tablets; use native recording apps or third-party tools instead.
- Duration Limit: Recordings are capped at 8 hours; after that, they automatically stop.
Easier Way: Record Google Meet with Wudpecker’s Desktop Apps
Recording your meetings has never been easier with Wudpecker's desktop apps. Follow these 4 simple steps to start recording your meetings right away (similar steps apply to both Mac & Windows):
Step 1: Install the desktop app for Mac or Windows.

.png)
Step 2: Sign up or sign in to Wudpecker with your Microsoft or Google account. (A browser tab will automatically open for that).
.png)
Step 3: Start recording.
Step 4: Pause, resume, or discard the recording anytime.
.png)
Once you stop recording, Wudpecker automatically starts processing your notes and opens them in the browser.
Then, you can…
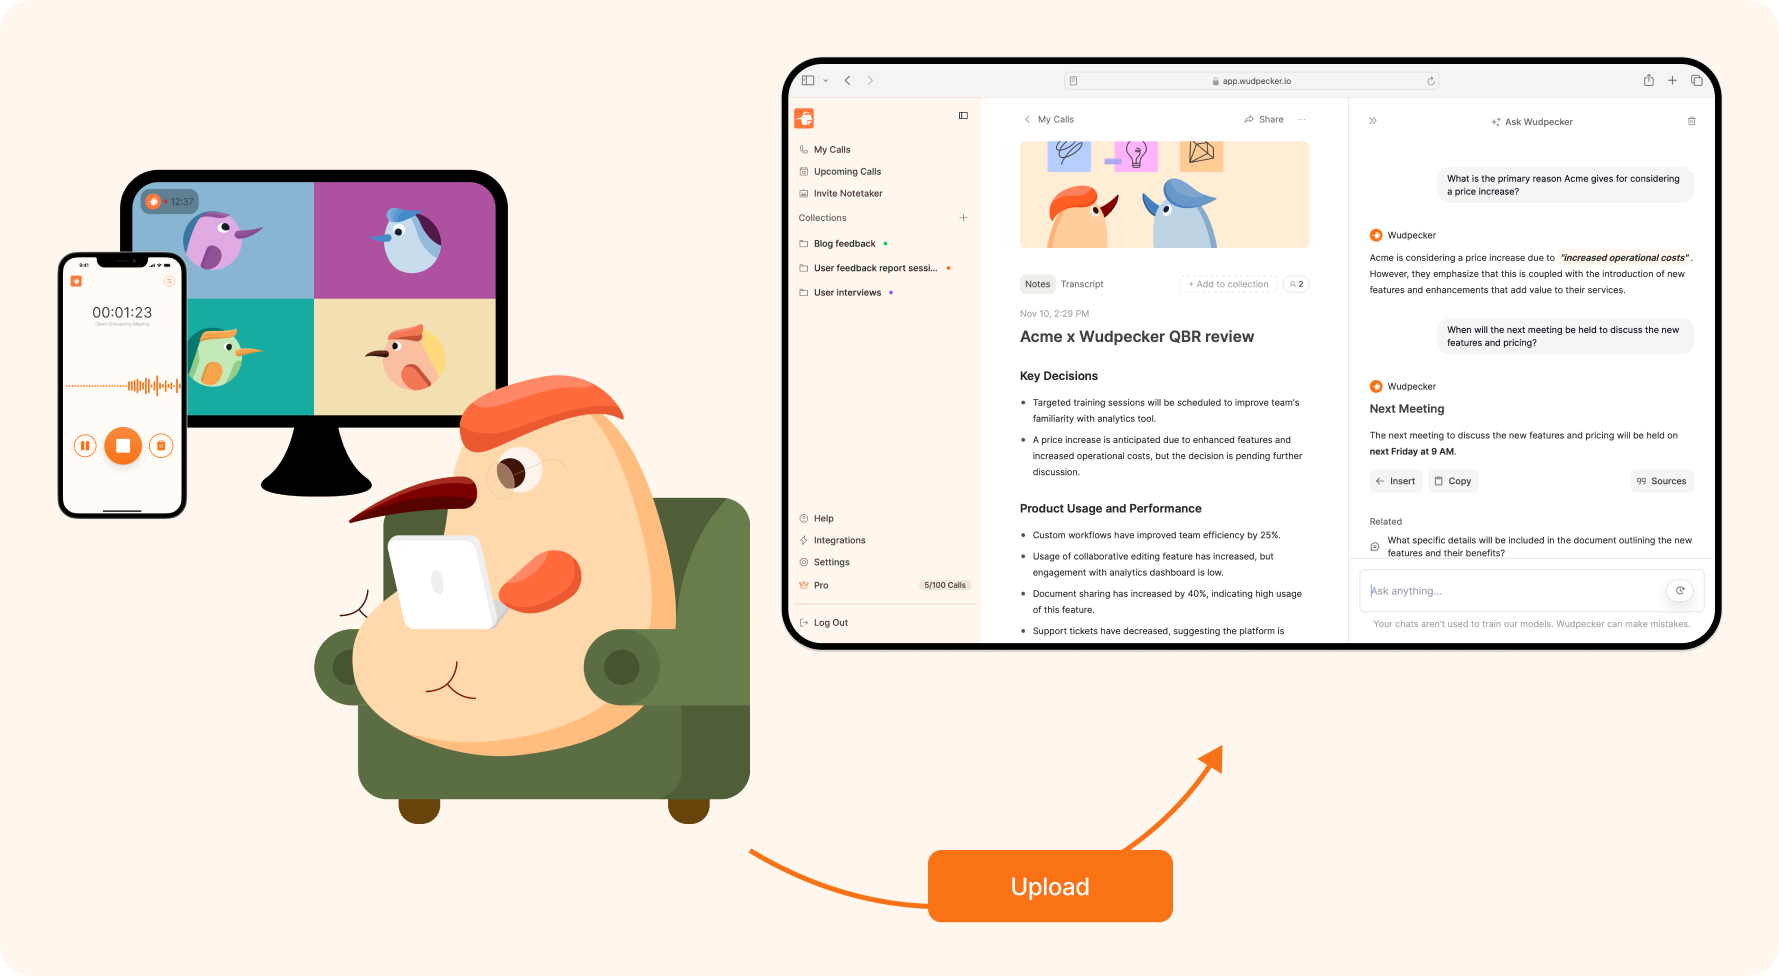
- Read and Edit the AI Summary: Wudpecker identifies and highlights the most important moments and takeaways from your meeting. You can also manually edit any part.
- Ask Wudpecker for Any Information Regarding the Meeting:** If you don't want to read through the entire meeting summary or it doesn’t mention everything you need, Ask Wudpecker is there to help. It can answer any question about your meeting and back it up with quotes from the conversation.
- Listen to the audio and read the transcript: Wudpecker also saves these for you in case you need to go back to basics.
Why Avoid Using Bots for Recording?
Recording meetings using AI notetaker bots might seem convenient, but it often comes with drawbacks that can negatively impact the meeting's dynamics and effectiveness.
One primary issue is the discomfort and awkwardness they can create. Imagine organizing a meeting only to find that a colleague has sent a bot in their place. This can be frustrating, as it undermines the personal interaction and engagement that is crucial for productive collaboration.
Additionally, the presence of AI bots can disrupt the natural flow of the meeting and may require unnecessary explanations to participants. If the bot is accidentally removed, getting them back can be a hassle., further interrupting the meeting.
Another significant concern is the inability to pause the recording if sensitive information is discussed. This means that confidential topics are recorded without any control, potentially compromising privacy. For these reasons, it's important to consider more secure and flexible recording methods that allow for greater control over what is captured.
For a deeper dive into the topic, check out the full blog.
.svg)


.png)

.png)


.png)


.png)
.png)


.svg)
